Azure Policy
Azure Policy is a service in Azure that helps you to create, assign, and manage policies. Policies are rules that can be assigned to resources in your …
This article is written for the Xpirit Magazine #15
Imagine your company having a multitude of azure resources, and you want to ensure that all of them are compliant with your company’s standards. You could go through each resource and check if they are compliant, but that would be a lot of work. Luckily, Azure Policy can help you with that. Azure Policy is a management tool that helps you enforce and control the settings and configurations of resources within your Azure cloud environment. It enables you to define and enforce rules and policies to ensure that your resources adhere to specific compliance and governance requirements. These policies can cover various aspects, such as security, resource tagging, and naming conventions, helping you maintain a consistent and secure cloud infrastructure. Azure Policy provides a centralized way to monitor and enforce these policies, ensuring that your Azure resources are aligned with your organization’s standards and best practices.
Azure Policy works with definitions to set the conditions and rules to be executed. Definitions dictate the logic, followed by assignments that apply the logic to a scope. A scope can be a management group, subscription, resource group, or resource. When an assignment is made, you can review the compliance of your resources in the compliance dashboard.
When you are ready to look at Azure Policy, you will probably be overwhelmed. Luckily, Microsoft Azure has supplied you with a set of built-in policies that you can use to get started. Additionally, when the built-in policies are not sufficient for your needs, you have the option to create custom policies. Below a short summary of the differences:
Important note for built-in policies, they are deployed to the Root Tenant Group and their names are GUIDs. Their display name will explain better what each policy definition does.
Azure Policy is quite powerful and enables your organization to enforce standards and assess compliance. It also helps to bring your resources to compliance through bulk remediation for existing resources and automatic remediation for new resources. But why would you use it? Let’s take a look at some of the benefits of using Azure Policy:
Now we know why we would use Azure Policy, let’s take a look at some of the real life scenario’s that can be solved with Azure Policy:
First, you start with a policy definition that dictates the logic to execute. This can be either a built-in or custom policy. Built-in policies are deployed to the Root Tenant Group and therefor available everywhere in your Management Group and Subscription hierachie. Custom policies are deployed to a specific scope and therefor only available in that scope or a child scope. The deployment of a policy definition is nothing more than making the policy definition available to be used.
In order to apply the logic of a policy definition to a certain scope, which can be the scope the policy definition was deployed to or any of the child scope in the hierachie. You will need to create a policy assignment. A policy assignment is the actual assignment of the policy definition to a scope. The policy assignment will evaluate the resources in the scope against the policy definition. The policy assignment will also show the compliance of the resources in the scope.
But what if I want to combine multiple policy definitions and assign it as part of a single policy? This is where policy initiatives come in. Policy initiatives are a collection of one or more policy definitions. Like policy definitions, these are deployed to a specific scope and can be assigned to a scope. The assignment of a policy initiative is the same as the assignment of a policy definition.

A policy definition is a JSON document that defines the logic of the policy. Let’s create a policy definition together.
The name of the policy definition. The name is used to identify the policy definition. The name must be unique within the scope of the policy definition.
A description of the policy definition. The description is used to describe the policy definition. The description is optional.
Policy definitions are using policy rules to dictate the logic to perform or validate. These rules are built using an if-then construct. The IF part contains the resource(s) to search for, the THEN part contains action to take.
The IF parts there are multiple options to identify the scope for the policy. These are using logical operators to check the conditions. Within the logical operators, conditions are used to determine if the policy should execute the THEN part. You can use the following operators:
With these logical operators you are flexible in terms of identifying which resources should be used in the specific policy. You can even use nested operators. The logical operators use conditions to identify when to perform the THEN part of the policy. Conditions are always described with a field value and an option that returns a true or false result. Possible options are:
The field values can contain a multitude of different options. Let’s go over some of the commonly used options:
For the THEN part, Azure Policy uses an effect to identify the action to be taken when the conditions of the definition or initiative are non-compliant. Eight types of effects are available:
Metadata about the policy definition. The metadata is used to provide additional information about the policy definition. The metadata is optional. Common metadata properties are:
Parameters are optional. They can be used to make the policy definition more flexible. Parameters are defined in the parameters section of the policy definition. Parameters are referenced in the policy rule by using the following syntax: [parameters('parameterName')]. Parameters will be prompted for when assigning the policy definition.
Let’s take a look at an example of a policy definition. The following policy definition is used to audit the use of the Microsoft.Storage/storageAccounts/networkAcls/defaultAction property. The policy definition is named audit-storage-account-network-acl-default-action and has the following properties:
Microsoft.Storage/storageAccounts/networkAcls/defaultAction property.type of the resource is Microsoft.Storage/storageAccounts and the Microsoft.Storage/storageAccounts/networkAcls/defaultAction property is not equal to Deny, then audit the resource.Storage and the version is 1.0.0.{
"properties": {
"displayName": "Audit storage account network ACL default action",
"description": "Audit the use of the Microsoft.Storage/storageAccounts/networkAcls/defaultAction property.",
"mode": "Indexed",
"policyRule": {
"if": {
"allOf": [
{
"field": "type",
"equals": "Microsoft.Storage/storageAccounts"
},
{
"field": "Microsoft.Storage/storageAccounts/networkAcls/defaultAction",
"notEquals": "Deny"
}
]
},
"then": {
"effect": "audit"
}
},
"metadata": {
"category": "Storage",
"version": "1.0.0"
}
}
}
I only want to allow resources to be deployed in the West Europe region. This can be achieved by using the DENY effect, it will verify the condition and it will DENY the deployment if the condition returns as true.
In this case IF the location is not equal to WestEurope returns true THEN we DENY the deployment.
"policyRule": {
  "if": {
    "not": {
      "field": "location",
      "equals": "WestEurope"
    }
  },
  "then": {
    "effect": "Deny"
  }
}
I want to always add soft delete on key vaults on creation. For this scenario we can use APPEND as the effect, we will verify if the condition if true and then we will append a specific configuration/property.
In this case, we verify IF the type of the resource is a Key Vault and if the soft delete option is not true.When the conditions have been verified, we will THEN APPEND the soft delete option.
"policyRule": {
  "if": {
    "anyOf": [
      {
        "allOf": [
          {
            "field": "type",
            "equals": "Microsoft.KeyVault/vaults"
          },
          {
            "field": "Microsoft.KeyVault/vaults/enableSoftDelete",
            "notEquals": true
          }
        ]
      }
    ]
  },
  "then": {
    "effect": "append",
    "details": [
      {
        "field": "Microsoft.KeyVault/vaults/enableSoftDelete",
        "value": true
      }
    ]
  }
}
As always with cloud resources, the preferably way to deploy them is using Infrastructure as Code (IaC). Azure Policy definitions can be deployed using ARM templates, Azure CLI, Bicep, Terraform, or PowerShell. The following example shows how to deploy the policy definition using a PowerShell script:
New-AzPolicyDefinition -Name 'audit-storage-account-network-acl-default-action' -DisplayName 'Audit storage account network ACL default action' -Description 'Audit the use of the Microsoft.Storage/storageAccounts/networkAcls/defaultAction property.' -Policy 'audit-storage-account-network-acl-default-action.json' -Mode All
Important to note is that the PowerShell cmdlet uses the -Policy argument to define the Policy Rule. Each of the important parts of the policy definition is defined in the cmdlet.
File: audit-storage-account-network-acl-default-action.json:
{
  "if": {
    "anyOf": [
      {
        "allOf": [
          {
            "field": "type",
            "equals": "Microsoft.KeyVault/vaults"
          },
          {
            "field": "Microsoft.KeyVault/vaults/enableSoftDelete",
            "notEquals": true
          }
        ]
      }
    ]
  },
  "then": {
    "effect": "append",
    "details": [
      {
        "field": "Microsoft.KeyVault/vaults/enableSoftDelete",
        "value": true
      }
    ]
  }
}
A policy initiative is a collection of one or more policy definitions. Policy initiatives are used to group policy definitions together. This can be useful when you want to assign multiple policy definitions to a scope. Instead of assigning each policy definition individually, you can assign the policy initiative. The policy initiative will then assign all the policy definitions that are part of the policy initiative. Let’s create a policy initiative together.
{
  "properties": {
    "displayName": "Audit storage account network ACL",
    "description": "Audit the use of the Microsoft.Storage/storageAccounts/networkAcls/defaultAction property and the Microsoft.Storage/storageAccounts/networkAcls/bypass property.",
    "metadata": {
      "category": "Storage",
      "version": "1.0.0"
    },
    "policyDefinitions": [
      {
        "policyDefinitionId": "/providers/Microsoft.Authorization/policyDefinitions/audit-storage-account-network-acl-default-action",
        "parameters": {}
      },
      {
        "policyDefinitionId": "/providers/Microsoft.Authorization/policyDefinitions/audit-storage-account-network-acl-bypass",
        "parameters": {}
      }
    ]
  }
}
As always with cloud resources, the preferably way to deploy them is using Infrastructure as Code (IaC). Azure Policy initiatives can be deployed using ARM templates, Bicep, Terraform, or PowerShell. The following example shows how to deploy the policy initiative using a Terraform:
# Create a new policy initiative using the policy definitions supplied in the audit-storage-account-network-acl.json file
New-AzPolicySetDefinition -Name 'audit-storage-account-network-acl' -PolicyDefinition 'audit-storage-account-network-acl.json'
File: audit-storage-account-network-acl.json:
[
  {
    "policyDefinitionId": "/providers/Microsoft.Authorization/policyDefinitions/audit-storage-account-network-acl-default-action",
    "parameters": {}
  },
  {
    "policyDefinitionId": "/providers/Microsoft.Authorization/policyDefinitions/audit-storage-account-network-acl-bypass",
    "parameters": {}
  }
]
A policy assignment is the actual assignment of the policy definition or policy initiative to a scope. The policy assignment will evaluate the resources in the scope against the policy definition or policy initiative. The policy assignment will also show the compliance of the resources in the scope. Let’s create a policy assignment together, using PowerShell.
# Get the subscription data
$Subscription = Get-AzSubscription -SubscriptionName 'Subscription01'
# Get the policy definition data
$Policy = Get-AzPolicyDefinition -Name 'audit-storage-account-network-acl-default-action'
# Create the policy assignment using the retrieved subscription and policy definition data
New-AzPolicyAssignment -Name 'audit-storage-account-network-assignment' -PolicyDefinition $Policy -Scope "/subscriptions/$($Subscription.Id)"
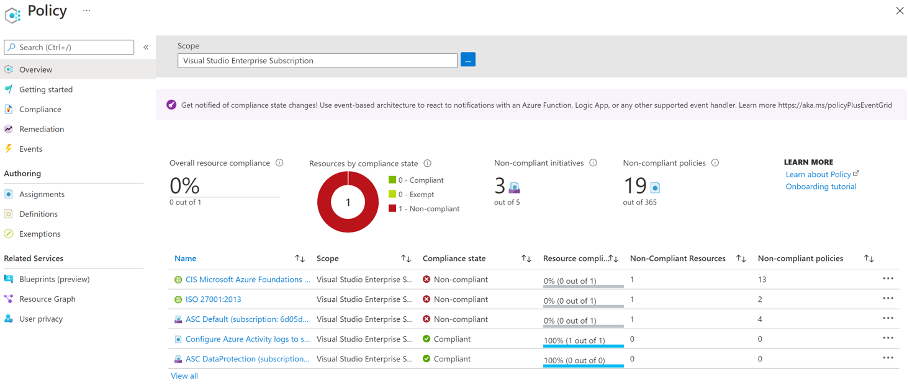
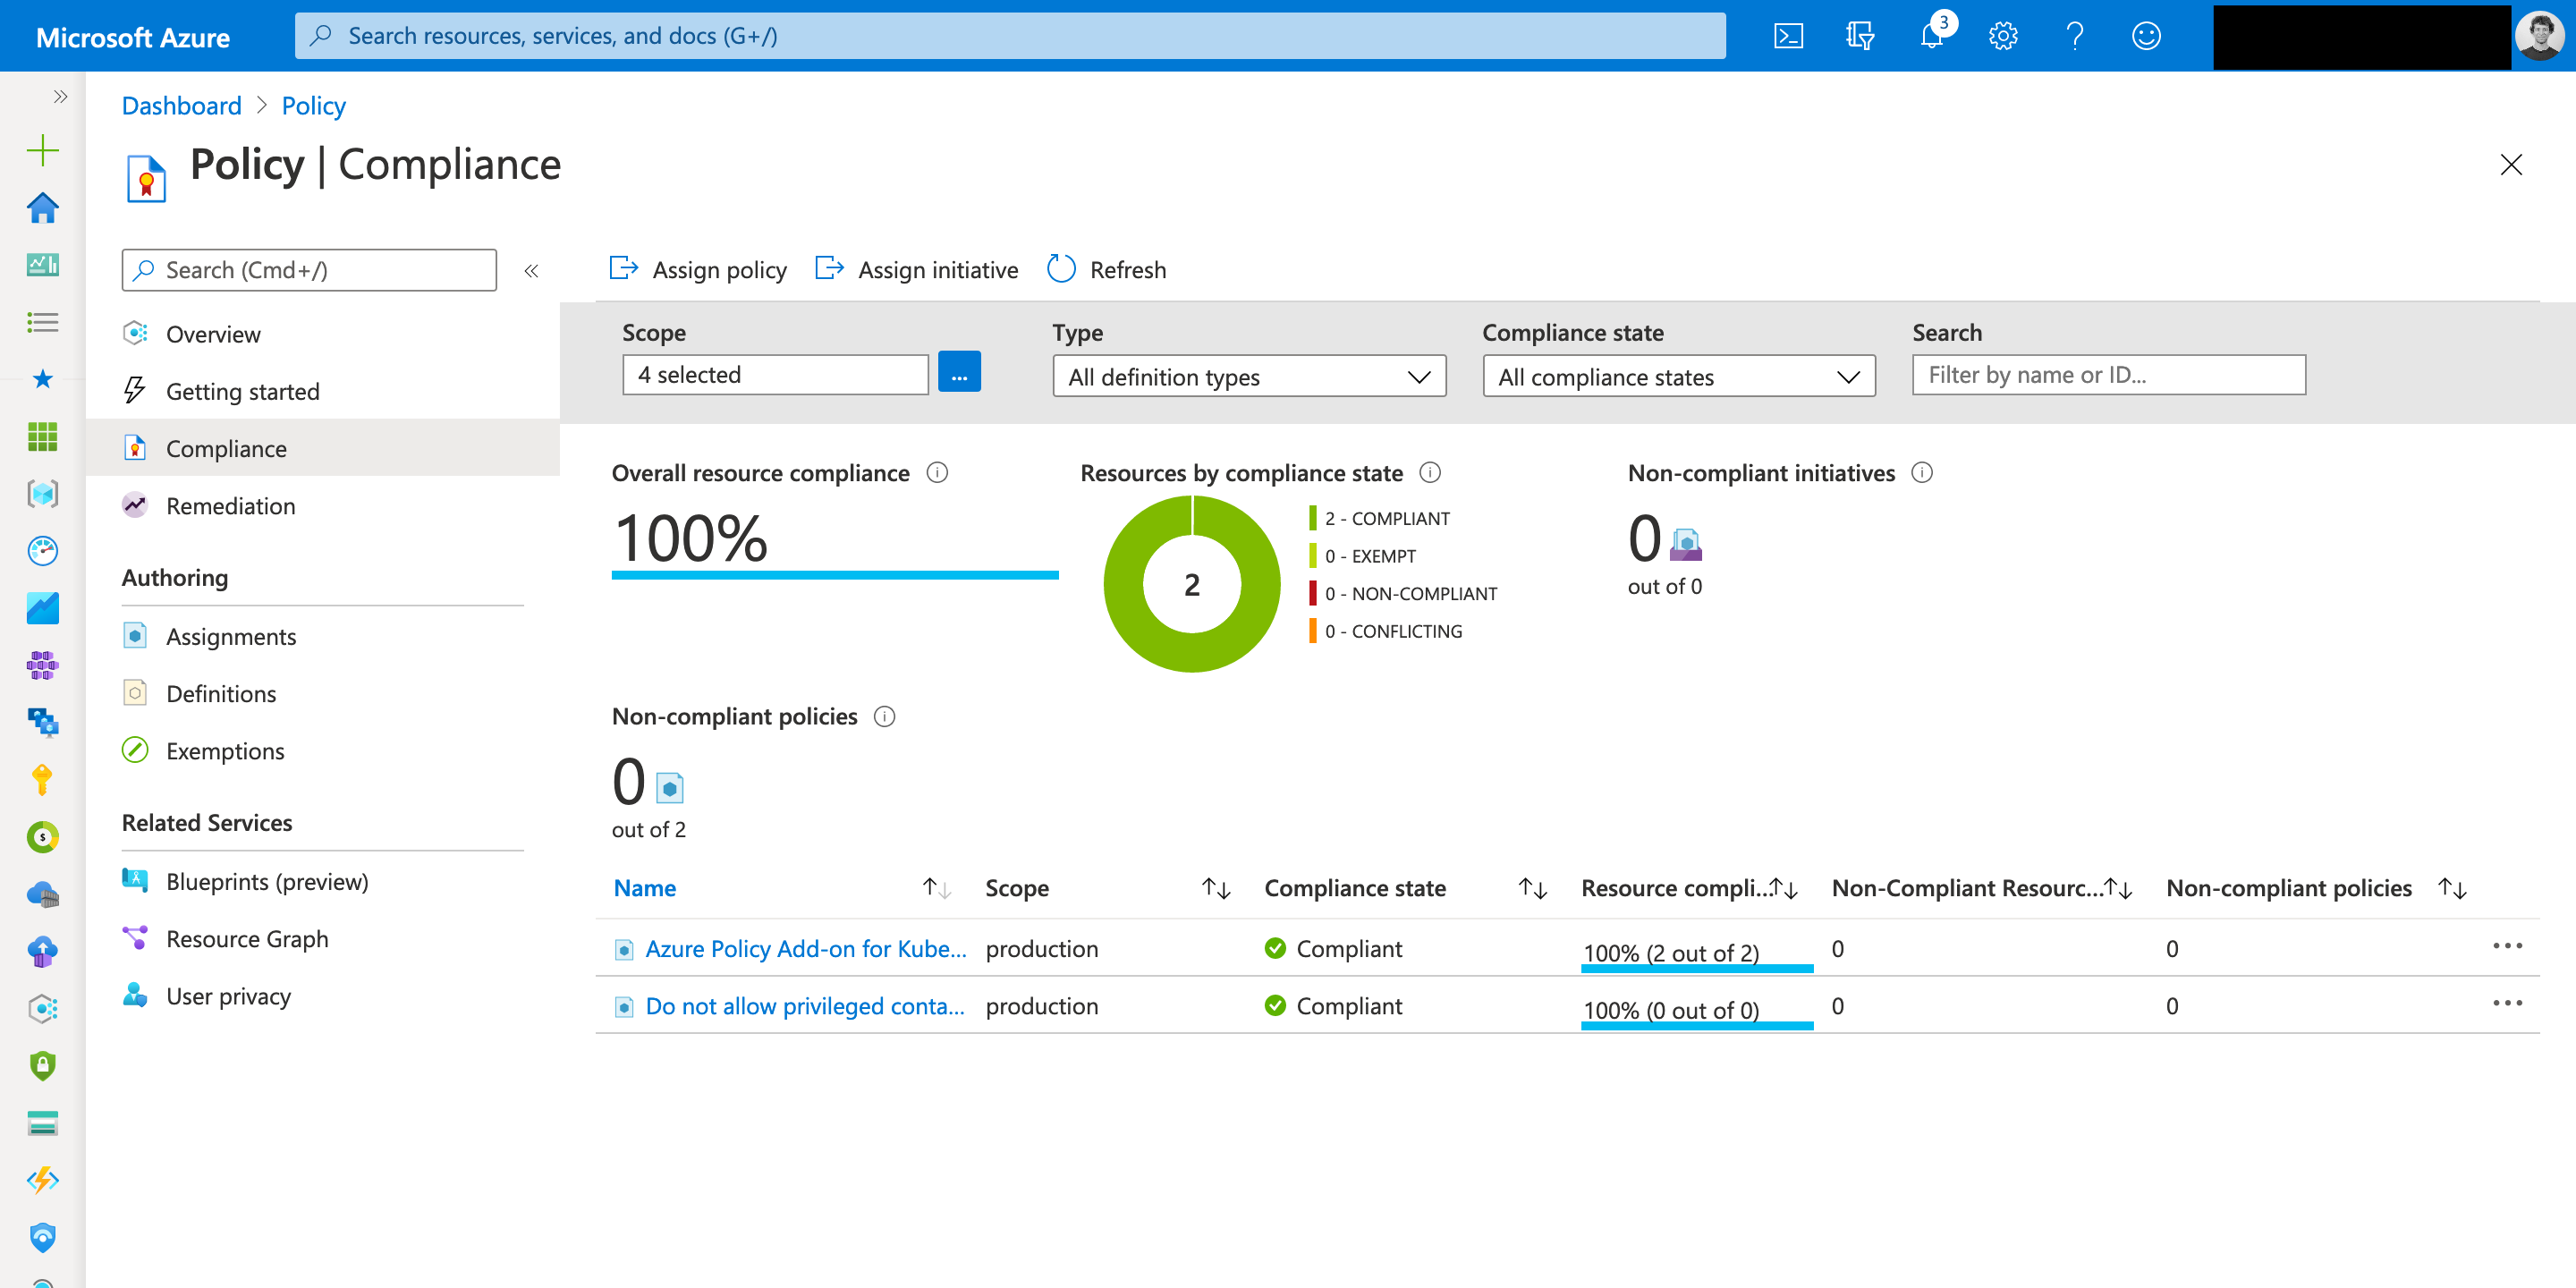
After you’ve have created and assigned your policies, you can view the compliance of your resources. The compliance dashboard provides an aggregated view of the state of your environment. It shows the overall state of the environment and allows you to view the state of individual resources or policies. The compliance dashboard can be found in the Azure Portal under All services > Policy > Compliance.
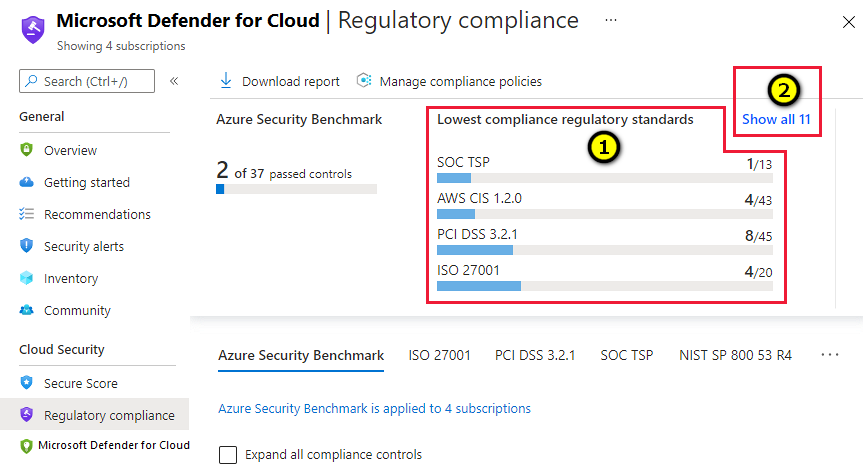
In order to view regulatory compliance, Microsoft Azure also uses Azure Policy to report on the compliance state of the regulatory compliance standards you have assigned. Whenever you select a regulatory compliance standard, Azure Policy will automatically create a policy assignment to audit the compliance state of the regulatory compliance standard. Azure Defender for Cloud also uses the input from Azure Policy to show recommendations in the Azure Portal.
To view the compliance state of the regulatory compliance standards you have assigned, you can use the regulatory compliance dashboard. The regulatory compliance dashboard can be found in the Azure Portal under All services > Microsoft Defender for Cloud > Regulatory compliance.
Remediation is the process of bringing a non-compliant resource into compliance. When remediation is done manually, you can trigger the remediation from the compliance dashboard. When remediation should be done automatically, which is only possible when using the DeployIfNotExists or Modify effect, you can configure the policy to automatically remediate non-compliant resources. In order for the policy to remediate automatically, it will use a managed identity. This managed identity should be supplied in the policy assignment. In order to use the remediation, you need to specify, in the policy definition, which role the managed identity should have on the resource. The policy assignment will start the deployment to perform the remediation task. When using the DeplyoIfNotExists effect, the deployment will be visible in the deployment dashboard so you can track and troubleshoot the deployment.
Let’s use a built-in policy definition to show how automatic remediation works. The built-in policy definition is named Add or replace a tag on resource groups and has the following PolicyRule logic:
{
  "if": {
    "allOf": [
      {
        "field": "type",
        "equals": "Microsoft.Resources/subscriptions/resourceGroups"
      },
      {
        "field": "[concat('tags[', parameters('tagName'), ']')]",
        "notEquals": "[parameters('tagValue')]"
      }
    ]
  },
  "then": {
    "effect": "modify",
    "details": {
      "roleDefinitionIds": [
        "/providers/microsoft.authorization/roleDefinitions/b24988ac-6180-42a0-ab88-20f7382dd24c"
      ],
      "operations": [
        {
          "operation": "addOrReplace",
          "field": "[concat('tags[', parameters('tagName'), ']')]",
          "value": "[parameters('tagValue')]"
        }
      ]
    }
  }
}
The policy definition will check if the resource type is a resource group and if the tag is not equal to the specified value. If the conditions are true, the policy will modify the resource group and add or replace the specified tag.
As described ealier, we should create a policy assignment to make this logic active on a certain scope, let’s create a policy assignment together, using PowerShell.
# Get the subscription data
$Subscription = Get-AzSubscription -SubscriptionName 'Subscription01'
# Get the policy definition data, using a Where-Object, since built-in policies are named with a GUID
$Policy = Get-AzPolicyDefinition | Where-Object {$_.Properties.DisplayName -eq 'Add or replace a tag on resource groups'}
# Define the parameters for the policy assignment to pass to the -PolicyParameterObject parameter
$parameters = @{'tagName'='Environment';'tagValue'='Production'}
# Create the policy assignment using the retrieved subscription and policy definition data
New-AzPolicyAssignment -Name 'add-tag-resource-group' -PolicyDefinition $Policy -Scope "/subscriptions/$($Subscription.Id)" -IdentityType 'SystemAssigned' -Location 'WestEurope' -PolicyParameterObject $parameters

The policy assignment will automatically remediate the resource group and add or replace the specified tag. The deployment will be visible in the deployment dashboard so you can track and troubleshoot the deployment.
So what happens when you create a resource group without the specified tag? Let’s try it out!
# Set the subscription context
Set-AzContext -Subscription 'Subscription01'
# Create a new resource group without the specified tag
New-AzResourceGroup -Name 'rg-remediation-test' -Location 'WestEurope'
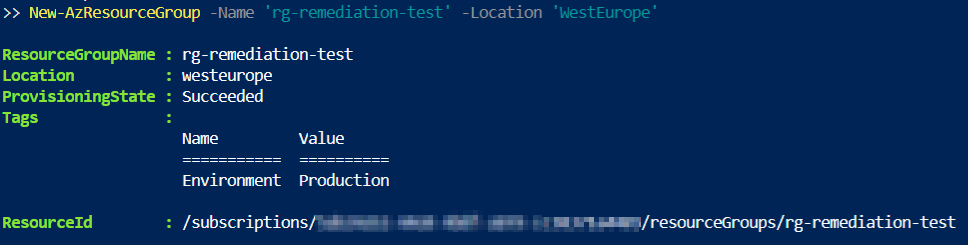
As you can see, the resource group is created without the specified tag and the output already shows that the policy assignment has remediated the resource group. When we check the resource group, we can see that the tag is added.

Let’s use the same example as with the automatic remediation, but we have now changed the policy to seek the TagName:Demo with a TagValue:ManualRemediation.
# Get the subscription data
$Subscription = Get-AzSubscription -SubscriptionName 'Subscription01'
# Get the policy definition data, using a Where-Object, since built-in policies are named with a GUID
$Policy = Get-AzPolicyDefinition | Where-Object {$_.Properties.DisplayName -eq 'Add or replace a tag on resource groups'}
# Define the parameters for the policy assignment to pass to the -PolicyParameterObject parameter
$parameters = @{'tagName'='Demo';'tagValue'='ManualRemediation'}
# Create the policy assignment using the retrieved subscription and policy definition data
New-AzPolicyAssignment -Name 'add-tag-resource-group' -PolicyDefinition $Policy -Scope "/subscriptions/$($Subscription.Id)" -IdentityType 'SystemAssigned' -Location 'WestEurope' -PolicyParameterObject $parameters
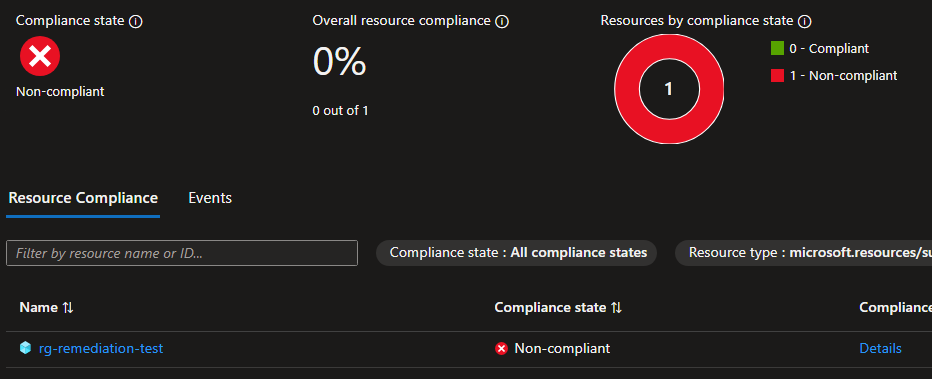
Since the policy is not compliant, we can manually remediate the resource group by clicking on the Create Remediation Task button in the assignment page on the subscription.
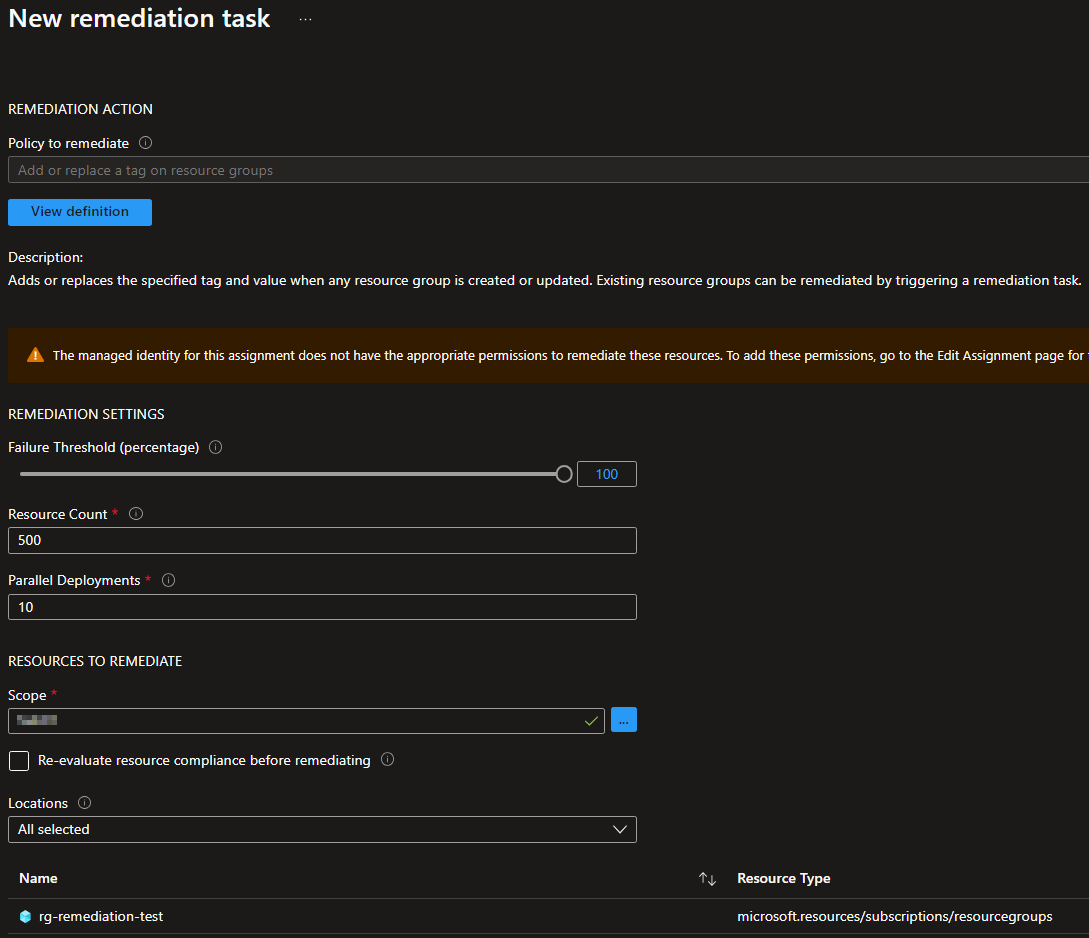
After the remediation task has been created, we can see the task in the remediation tasks overview. And you should even see a completed remediation task.

Sometimes you want to exclude certain resources from being evaluated by a policy. This can be done by using exemption. Exemptions can be made on policy assignments and on individual resources. Exemptions can be made for a specific amount of time or indefinitely. Exemptions can be made for the following reasons:
Exemptions can be created using the Azure Portal, PowerShell, Azure CLI, or REST API. Let’s create an exemption using PowerShell.
# Get the subscription data
$Subscription = Get-AzSubscription -SubscriptionName 'Subscription01'
# Get the policy assignment data
$PolicyAssignment = Get-AzPolicyAssignment -Name 'add-tag-resource-group' -Scope "/subscriptions/$($Subscription.Id)"
# Create the exemption
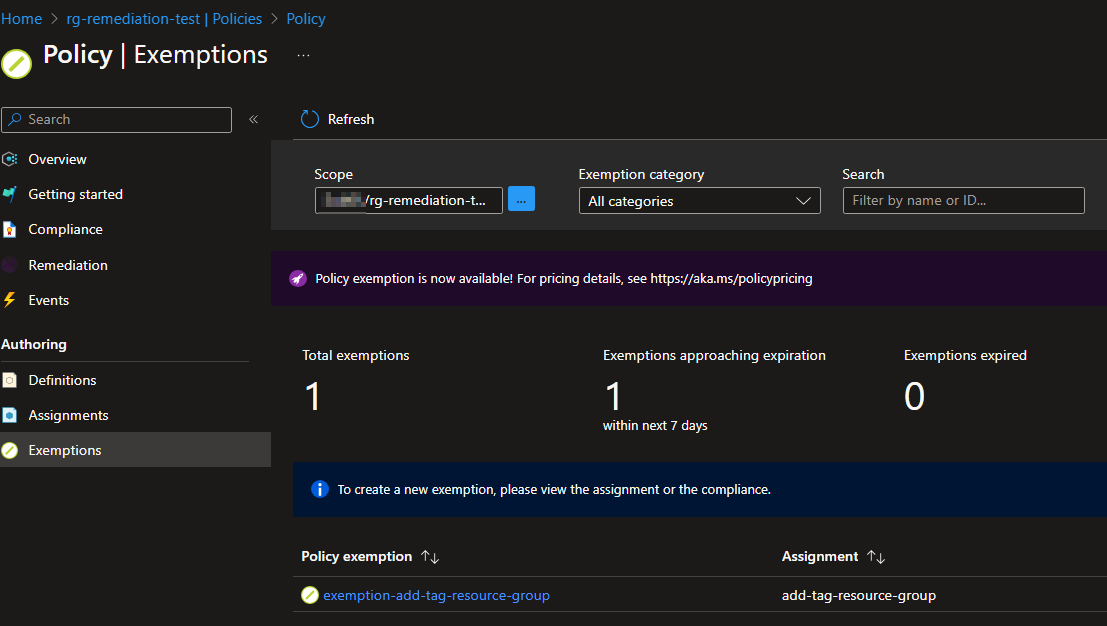
New-AzPolicyExemption -Name 'exemption-add-tag-resource-group' -PolicyAssignment $PolicyAssignment -ExemptionCategory 'Waiver' -ExpiresOn (Get-Date).AddDays(7)
Now that you know what Azure Policy is and how to use it, you can start using it in your own environment. Start with the built-in policies and see if they fit your needs. If they don’t, you can always create custom policies.
If you want to explore and view anything policy related in the Azure Portal, simply go to All services > Policy. Here you can view the compliance dashboard, policy definitions, policy initiatives, policy assignments, and exemptions.
If you want to know which Azure Policies are built-in available, AzAdvertizer is a great resource to view all the built-in policies.
Azure Policy is a service in Azure that helps you to create, assign, and manage policies. Policies are rules that can be assigned to resources in your …
In 2022 I published an article in our Xpirit Magazine #13 about Azure Virtual Desktop. In this post I will give you a summary of the article. What is …